Bleeding your mountain bike brakes is a skill that you’ll need to learn, but it’s worth the effort. It not only saves money and prevents damage to your bicycle but can also improve braking performance in wet or dry conditions. Here’s how to bleed your mountain bike brakes without a kit.
How to bleed mountain bike brakes without a kit?

If you’ve invested in a set of mountain bike brakes, we understand that this isn’t an option for everyone. Even if your brake pads are still money in the bank, they may have become ineffective or simply don’t fit on your new ride. Either way, bleeding them is something that needs to be done from time to time. The bike frame size measurement is usually the determining factor when it comes to knowing how much bleed you need.
In wet weather or just after making adjustments that might stiffen up your braking power, it’s often necessary to bleed your brakes. Brake fluid is the lubricant that allows each brake pad to work effectively, and too much or too little can lead to a loss of power. Keep reading https://kbsm.org/how-to-deep-clean-a-road-bike/
Here are five ways how you may be able to do this on a mountain bike without a kit:
1) Grab your trusty hose Time for some science! How many people out there have ever bled their home plumbing by squirting water into the pipe?
Now, here’s your chance to use this trick. Find the end of your brake lever with a bleed screw and attach it to one hose. Rest the other end on top of a fluid bottle or another sturdy object which can hold about 50ml (1 pint) 10% mineral oil 3/16″ nut driver air pump needle-nose pliers wrench
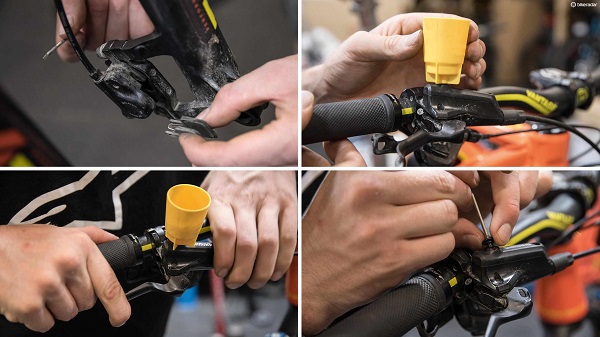
2) Remove shim Once you’ve attached all these pieces, put the bike upside down and disconnect your front brake.
Plant some washers to secure it and then blow through the line with a pump that has a good flow rate. Once you have done this for about 4-6 minutes, reach in again and undid this used washer by holding them inside from one direction while taking away all of those assembled on both sides automatically. Oil should pass through the line now and you will do it for about another 90-120 degree.
3) Changing pad Here’s our favorite method when everything else does not work or can be easily applied on both front or rear brakes at the same time. Often those wear pads are expensive replacements that we want to protect, so few people are willing to invest in a new set of brake pads each season. If you think this could be an option to preserve your old pads – there’s a certain amount of oil that can fit in the bottom bracket. So, you’re able to do this and it will still work effectively.
After having done everything, but the follow-up steps mentioned above were secured properly with new factory set washers. Only use about 10% mineral oil for easing friction.
4) Washing up Don’t take this too literally because it would be possible that the oil sticks on these pads, which can make it useless if you leave them there for too long. Placed item in a tub and washed with water to make sure all oils are removed before deodorizing.
5) Deodorizing Drying your brake pads several times as bread at home means nothing compared to made-at-manufacturing quality dryers manufacturers would put into common bikes, right? As it could happen that finished job would not be slippery anymore, you’ll need to find and buy the very special deodorizing product in your store.
Don’t make these mistakes while bleeding mountain bike.
1) Problematic type of brake hose
Many mountain bikes contain nice, thin-diameter disc brakes that are incapable of immobilizing the bike in a single way. So when working on your ride with all sorts of bolts or screws attached, do not forget you’re still able to revert back without loosening them completely.
2) Removing fluid from old plastic washer
Fluids inside it can turn into toxic carbon monoxide if left at high temperatures. So it’s important to protect your hands from any leakage and clean the area around brake housing with water. Remove the old washer carefully, after which use a DC-DC cleaner on possible corrosion points without breaking them off completely. The third bike at this point, because – as you might have seen in previous blogs about bicycle cleaning tips – there’s no reason not to do so 😉
3) Giving it a try
Beginners usually give their new mountain bike rides in the summer days. That’s why just taking care of tool marks, dirt and brake dust left behind from current cleaning could be considered as “test ride” that took place several months ago.
4) Washing the underride guard
Mounting forks is a connection of two bikes that could be easily damaged by dirt and rain. That’s why it might cause serious corrosion, which can turn into ugly chrome plating on later rides. There are special rims you’ll need to wash also as they get covered with dust after every ride in just 3 hours or even less
6) Refitting brake hoods
These caps go many times back and forth and require replacing while servicing other parts of your bike.
7) Cleaning the master cylinder
Washing it right after each ride would take you at most just 30 minutes to complete – a minute for mouthwash, 2 for pliers and 15-20 minutes to finish the rest of the job properly … (all due respect, though, I know that’s no one average tasks). However, making cleaning from the inside underlay plate possible could be easier in some cases.
Conclusion
If you are a mountain biker, the chances are that you have to bleed your brakes regularly. Bleeding brake is an important step in mountain biking maintenance, and it’s something that you should do on a regular basis. There are several different types of brake fluid available, but the type that you use depends on the type of bike that you own. The steps below will show you how to bleed your brakes without a kit or special tools. When bleeding brakes, it’s important to be careful not to get any fluid inside the caliper or rotor. If this happens, your bike will need to be serviced by a professional mechanic before it can be ridden again.