Bicycle wheels are a critical part of your ride and giving them to spend straight and around is an important part of the performance of the bike.
Today we have discussed radial truing that’s the up and down or egg-shaped aspect of the spinning wheel.
Truing Back
If you want to learn how to true a bike wheel easily then check this article. Before we get into this, you should check out how will wheel works, where we lay out the concepts of wheel truing, the structure of a wheel and you’re also going to need lateral or side to side for the rim.
The wheel of the bicycle was a hoop with a set of spokes that connect it to a hub spokes are pulling on the rim from both the right and left sides.
Wheel truing is the process of using a spunk ranch to change this bulk tension, to improve the run-out or spinning straightness and roundness of the wheel.
It is this tightening and loosening as spokes that we will use to manipulate spoke tension and truing wheels.
Let’s take a look at some common tools and get set up to begin truing. First, we need to hold the wheel steady as it spins. One way to do this is to use the truing Stand.
These are common in bike shops and adjust to many different hub widths and different wheel diameters.
Truing stands help isolate wheel truing problems and allow for easier and faster work. When truing and if you don’t have a truing stand, you can use the bike to hold the wheel.
The wheel should be able to spin freely, such as by putting it in a repair stand.
We need a stand true indicator that will help find radial deviations. The truing stand has these indicator fingers that can be moved up and down as well as in and out from the rim to help us easily find these deviations.
If you are truing the bike, you can make an indicator by attaching something to the frame, like a zip tie.
This can be moved up and down to help show radial deviations as the wheel spins in the frame. We’ll also need a way to turn the nipple at the end of the spoke. We increased tension by turning the nipple or the nut of the spoke system.
looking at the nipple from the outside of the rim, you will turn it clockwise to tighten and counter-clockwise to loosen.
When working on a truing stand, however, we proceeded, the nipple is upside down and this direction is tightening the nipple and working in the bike. The nipple is right side up and this is tightening the nipple.
Spoke riches come in a variety of different sizes to fit different sized spoke dimples and is important to use the correctly sized wrench through a larger wrench.
We’ll give a sloppy fit that will likely lead to rounding out the corners and damaging the nipple. If the bike is real use as a common square shape, nipple best practice is to measure the wrench flats using a caliper. Let’s get you there in size that fits the nipple as snugly as possible.
Otherwise, a multi-sided wrench such as the SW 7.2 fits the three most common square shape nipple sizes.
When you begin truing, if the nipple seems hard to turn or they’re creaky, they need to be lubricated. What a drop a lubricant with the spoke exits the apple and where the nipple exits the rim.
Finally, if you’re just beginning to learn wheel truing, it can be useful to take the tire off the rim with the tire removed the radial deviations and you’re looking for it. The Ram will be easier to see.
Radial truing can be tricky, especially if you’re just learning. Expect they’ll go back and forth between radial corrections and the side to side or lateral corrections as your work, your way around the wheel.
Radial
Let’s define the two basic radial deviations we’re looking to correct as of the wheel spins, there was a radial deviation, or a section of the rim seems to move inward or toward the hub. We call this a low spot.
It can be short, say across two spokes, or this can extend longer spending six or more sparks. The other type of radial deviation is a high spot where the section of the ramp moves away from the hub. Like the low spots, these high spots can span is a short or long section of the wheel. The wheel of course can have a mix of both high and low spots because the rim is somewhat flexible.
We tend to average out both until we get an acceptable wheel. Install the wheel in a truing stand or back into the bike before beginning on radial deviations, check that the wheel is reasonably laterally truing.
Well wheel truing here and does not matter whether you are paying attention to the left or right edge of the rim sidewall.
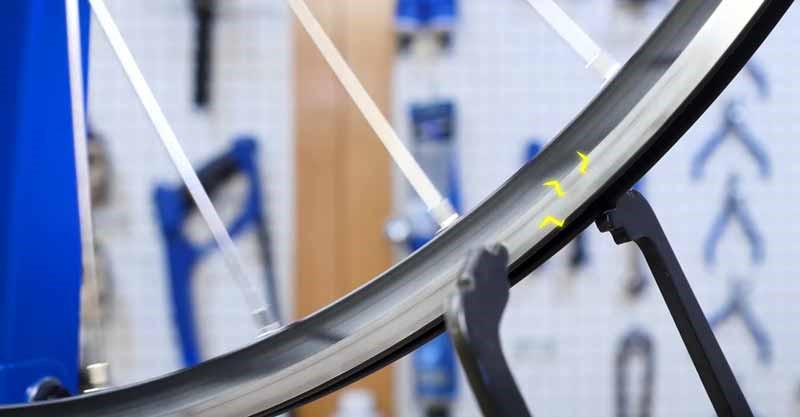
In fact to keep things simple pull one arm away and block it with a small hex ranch, spin the wheel and adjust your indicator. So that is sitting below the outer edge of the rim, but not close enough to touch.
If you’re using a Parkville truing Stand, use the top of the indicator tip as your reference begin by locating the high spot by slowly moving the caliper up upward.
Until you see or hear lightly context, it’s spinning REM isolate this high spot by slowly moving the rim back and forth through this area, to see where it begins and ends correctly this radial deviation by moving the section of the ramp toward the hub and this correction, we’re going to tighten spokes from both sides.
That’s because folks not only pull from the right and the left side, they also pull the rim toward the hub. We can simulate, but tightening will do by grabbing a spoke from the right and left side and squeezing, and seeing that that section of the rim, it’s going to move toward the hub for now. We’ll give each of the high spot areas.
The rim is no longer rubbing. So the high spot was reduced. Now we repeat the process, spin the wheel and continue to locate isolate and correct.
As you proceed, it can occur that there will be some lateral airs created as you correct. The radial problems. Check the lateral true is acceptable about every three or four radial corrections.
Spots Indicate
Typically in is festive, beginning, or radial truing with the highest spots after correcting this, the low spots won’t work so well again, move the indicator below the rim, but not touching it.
Send the rim to locate the gaps between the rim and the indicator. Find that area where the gap looks the largest.
Remember earlier, what occurs when two spokes were squeezed? Watch the rim and note that as the spoke tension was relaxed, the section tends to move outward away from the hub, isolate the center of the slow spot by moving the ramp back and forth in this zone. The section of Ram is pulled too close to the hub and needs to be moved away in this zone.
Conclusion
So that’s the basic process for a way to truing a bike wheel. For other aspects of wheel truing, Sierra wheel truing playlist, for any type of bike repair information visit OutdoorXsports and thanks for reading our article.