






Your roof is one of the most important parts of your home. It protects everything inside from rain, wind, heat, and cold. However, like everything else, roofs wear down over time. Small problems can turn into big, expensive ones if you ignore them.
The good news is that many common roof issues can be handled on your own. You do not always need to hire a professional. With the right materials, the right tools, and a careful approach, you can fix minor damage yourself. This guide will walk you through everything you need to know to do it safely and affordably.
Why Regular Roof Maintenance Matters
Most homeowners only think about their roof when something goes wrong. That is a mistake. Regular home roof maintenance helps you catch small problems before they grow into major repairs. It also extends the life of your roof by years.
A well-maintained roof saves you money in the long run. Water damage from a leaking roof can affect your walls, ceilings, insulation, and even your foundation. Therefore, spending a little time and money now is far better than facing a huge repair bill later.
Additionally, a good roof adds to your home’s value. If you ever plan to sell, buyers and inspectors will look closely at its condition. Keeping it in good shape protects your investment.
Safety First: What You Need to Know Before You Climb
Before you touch a single shingle, safety must be your top priority. Roof work is one of the leading causes of home injury. However, with the right precautions, the risk is manageable.
Here are the basic safety rules to follow:
- Never work on a wet or icy roof. Surfaces become dangerously slippery.
- Always use a sturdy, properly angled ladder. Make sure it extends at least three feet above the roofline.
- Wear rubber-soled shoes with good grip. Avoid smooth-soled footwear entirely.
- Use a safety harness if your roof has a steep pitch. These are available at most hardware stores for a reasonable price.
- Never work alone. Have someone on the ground who can call for help if needed.
- Avoid working in strong winds or extreme heat. Both conditions increase risk significantly.
Taking these steps seriously is not optional. They are the foundation of any safe DIY roof project.
Tools and Materials You Will Need
You do not need a professional toolkit to handle basic repairs. Most of the items you need are affordable and easy to find. Here is a general list to get you started:
- Roofing nails and a hammer or roofing nail gun
- Replacement shingles that match your existing roof
- Roofing cement or sealant
- A pry bar or flat bar for removing damaged shingles
- A utility knife for cutting materials
- A caulking gun for applying sealant
- A measuring tape
- Safety gloves and protective eyewear
- Flashing material for sealing around vents and chimneys
Most of these items cost very little individually. You can often find starter repair kits at hardware stores that bundle the basics together. Therefore, you do not need to spend a lot to get started.
How to Identify Roof Damage Before You Repair
Knowing what to look for is just as important as knowing how to fix it. Start from the inside of your home. Check your attic for water stains, dark spots, or streaks on the wood. These are signs that water is getting through somewhere.
Next, look at your ceilings. Yellowish or brownish stains often point to a slow leak above. You may also notice peeling paint or bubbling wallpaper near the top of walls.
From the outside, look for these warning signs:
- Missing or cracked shingles
- Curling or buckling shingles
- Granules collecting in your gutters
- Damaged or rusted flashing around chimneys and vents
- Sagging sections anywhere on the roof surface
- Moss or algae growth, which can trap moisture
Once you spot the problem, you can plan the right fix. Identifying the issue clearly before you start saves time and avoids making things worse.
Fixing Missing or Damaged Shingles
This is one of the most common easy roof fixes homeowners face. Shingles can crack, curl, or blow off entirely during storms. Fortunately, replacing them is straightforward.
Start by purchasing replacement shingles. Try to match the color and style of your existing roof as closely as possible. Many hardware stores allow you to bring in a photo or sample for comparison.
To remove a damaged shingle, slide a pry bar under it and lift gently. Remove the roofing nails holding it in place. Slide the old shingle out carefully without disturbing the ones around it.
Slide the new shingle into place. Align it with the surrounding shingles. Secure it with four roofing nails placed just below the adhesive strip. Then press the overlapping shingle back down over the nail heads. Apply a small amount of roofing cement under the edges to seal everything in place.
This process usually takes less than an hour for a single shingle. Additionally, it costs very little — just the price of a few shingles and some sealant.
Sealing Roof Leaks with Roofing Cement
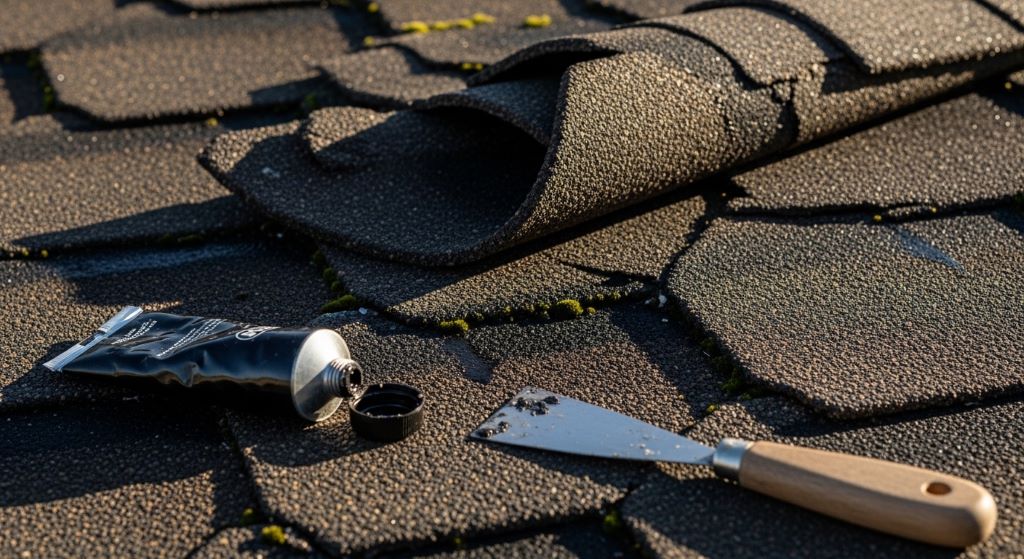
Sometimes a leak is not caused by a missing shingle. Small cracks and gaps in the roof surface can also let water in. Roofing cement is an affordable and effective solution for these situations.
First, locate the source of the leak. This can be tricky because water often travels along beams before dripping. Start from where you see the stain inside and work upward to find the actual entry point outside.
Once you find the crack or gap, clean the area around it. Remove any loose material, dirt, or debris. Dry the surface as much as possible before applying the cement.
Use a putty knife or caulking gun to apply roofing cement directly into the crack. Press firmly and spread it evenly. Smooth the edges so water cannot collect there. Allow it to dry fully before testing in rain.
This is one of the simplest approaches in home roof maintenance. It works well for small cracks, gaps around nails, or areas where shingles have started to lift slightly.
Repairing or Replacing Roof Flashing
Flashing is the thin metal material installed around chimneys, vents, skylights, and roof joints. Its job is to direct water away from these vulnerable areas. When flashing fails, leaks almost always follow.
You can often spot damaged flashing from the ground with binoculars. Look for rust, gaps, or sections that have lifted away from the surface. Up close, you may notice cracks or missing pieces.
For minor gaps, roofing sealant applied with a caulking gun is a quick fix. Clean the area thoroughly first. Then fill the gap and smooth it out carefully. This works well as a temporary solution or for very small separations.
For larger sections of damaged flashing, you may need to replace it entirely. Cut the new flashing to size using tin snips. Remove the old piece carefully. Fit the new piece in place and secure it with roofing nails. Seal all the edges with roofing cement to prevent any water from getting underneath.
Flashing repair takes a bit more skill than shingle replacement. However, it is still very manageable for a careful and patient DIY homeowner.
Dealing with Moss and Algae Growth
Moss and algae are more than an eyesore. Over time, they hold moisture against the roof surface and cause the material underneath to break down. Addressing them is an important part of ongoing roof care.
You can remove moss manually using a stiff brush. Work gently and always brush downward, never upward. Brushing upward can lift and break shingles. Be patient and take your time.
There are also affordable moss-killing sprays available at garden and hardware stores. Apply them on a dry day. Let the product work for the time recommended on the label. Then gently rinse the area with a low-pressure hose.
To prevent regrowth, consider installing zinc or copper strips along the ridge of your roof. When it rains, small amounts of metal wash down the surface and naturally inhibit moss and algae. This is a long-term and low-cost prevention strategy.
Additionally, trimming overhanging tree branches reduces shade on the roof. More sunlight means a drier surface, which is far less welcoming to moss and algae growth.
When to Call a Professional
DIY repairs work well for minor issues. However, some problems are beyond the scope of a homeowner working alone. Knowing when to call for help is just as important as knowing how to fix things yourself.
Contact a professional roofer if you notice:
- Large sections of sagging or structural damage
- Multiple layers of shingles that need full replacement
- Damage to the underlying decking or roof structure
- A leak you cannot locate after careful inspection
- Any issue that requires you to work in an unsafe position
A professional has the training, insurance, and equipment to handle complex jobs safely. There is no shame in recognizing when a problem is too big for a DIY approach. In fact, it is the smartest thing you can do.
Affordable Materials That Actually Work
You do not need to spend a lot to get quality results. Many budget-friendly materials perform just as well as expensive options for basic repairs.
Asphalt shingles are the most affordable roofing material and are widely available. They are easy to cut, install, and replace on your own. Roofing cement and sealant tubes cost just a few dollars each and go a long way. Flashing material is also inexpensive when purchased in rolls from a hardware store.
Furthermore, buying materials in small quantities for minor repairs keeps costs very low. You rarely need full bundles or rolls for easy roof fixes. Buy only what the job requires and store any leftovers for future touch-ups.
Comparison shopping between hardware stores or buying online can also save you money. Many well-reviewed roofing products are available at competitive prices when you take a little time to look around.
Conclusion
Taking care of your roof does not have to be complicated or expensive. Many of the most common problems — cracked shingles, small leaks, damaged flashing, and moss growth — can all be handled with basic tools and affordable materials.
The key is to start with safety, identify the problem correctly, and use the right materials for the job. Regular home roof maintenance prevents small issues from becoming costly disasters. Easy roof fixes handled promptly will extend your roof’s life and protect your home for years to come.
Start with a simple inspection. Deal with problems as you find them. And remember, when a job feels too big or too risky, a professional is always the right call. Your roof is worth the attention.
Frequently Asked Questions
How often should I inspect my roof for damage?
You should inspect your roof at least twice a year — once in spring and once in fall. Additionally, check it after any major storm. Catching damage early makes repairs far simpler and less expensive.
Can I repair a roof by myself if I have no experience?
Yes, for minor issues like replacing a few shingles or sealing a small crack, no prior experience is required. However, always prioritize safety. Take your time, follow instructions carefully, and do not take on work that feels beyond your comfort level.
What is the most affordable roofing material for DIY repairs?
Asphalt shingles are the most budget-friendly and widely available option. Roofing cement and sealant are also very affordable and useful for a wide range of small repairs.
How do I know if a leak is serious enough to need a professional?
If you cannot locate the source of the leak, if the water damage covers a large area, or if you notice sagging or structural issues, call a professional. These are signs that the problem goes deeper than a surface-level fix.
How long does DIY roof repair typically last?
A properly done repair using quality materials can last several years. Shingle replacements and flashing repairs, when done correctly, often hold up just as long as professional work. The key is using the right materials and following proper technique.
Related Topics:
How long do galvanized steel roofs last?
Why Are My Shingles Curling? Top Reasons and How to Prevent It